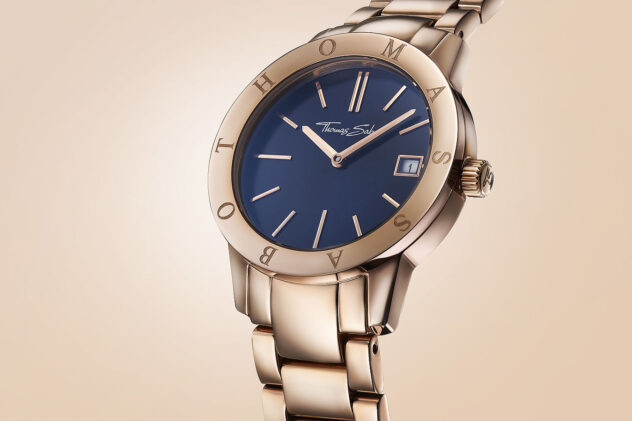
This month, I wanted to cover a rather tricky topic - watch photography.
I find watches to be one of the most complex objects to photograph. The set up alone can take hours of preparation. Getting everything right is painstaking work. But when the light hits the watch correctly and you have these beautiful highlights and shadows created, it feels worth all the time invested.

The setup for these shots was very complicated. I started off with three models of watches and planned the styling of the photos. I knew I wanted to highlight the reflectivity of the material and show the depth and the details of the product. I used multiple Siros 800 S which had a standard reflector and variety of honeycombs attached to showcase how reflective the surfaces of the watches were. In addition, I also used a Scoro 1600 S powerpack with three Picolites and directed their light through diffuser panels.


The fresnel spot and the projector attachment for the Picolites gave me a great advantage over normal honeycombs. It allowed me to zoom in and out as well as create a harder or softer spot. For the areas where I needed a very small and precise light, I chose to work with the projector attachment. Just like with the fresnel spot, the projector attachment not only allowed me to focus my spot, but also enabled me to create an even smaller spot than with the honeycomb.
What was really helpful for this shoot was the Phase One Live View in Capture One and the BronControl App. With Live View, I was able to first view the watch directly on my computer. This is immensely beneficial. I was able to see right away where the light was hitting my subject. Thus, I could easily make adjustments before I even started to take the shots.
In order to make the lighting adjustments, the BronControl app was perfect. I controlled the lights directly from my iPad and computer. This allowed me to turn the modeling lights of the individual flashes on & off, analyze the effect of each light source on the object, as well as to control the power output.

The camera I used for this shoot was the Phase One XF. It has a built-in focus stacking feature so that you just need to define the closest and furthest point of the object. The camera then automatically calculates the number of photos that are needed, in order to have a completely sharp image. I wanted to get as much detail as possible for the final photo. That is why I opted to stack 30 images. After I set up the camera, with one click the camera automatically took all 30 images. Later, I exported the images to Helicon Focus to for stack them together and create one completely sharp image.