How to: Photographing paintbrushes
The obvious basic idea was to stage three paintbrushes in a stage-like spotlight. Since all the objects were relatively small, this required the use of a light shaper that was also small and very precise in order to make the shadows appear as sharp as possible.

A Picolite with a projection attachment (1) and a medium sized pinhole best met these requirements. Since the projection attachment was used as a backlight, two additional hard lights (4 and 5) had to brighten the wooden handles of the brushes. A P70 normal reflector with a narrow honeycomb and another Picolite (with Fresnel Spot attachment) did the job.
The main light had a very narrow beam angle. Reflections across the studio walls were therefore non-existent and the shadow contrast correspondingly high. The two brighteners (4 and 5) were sometimes even positioned under the shooting table so as not to brighten these shadows unintentionally.
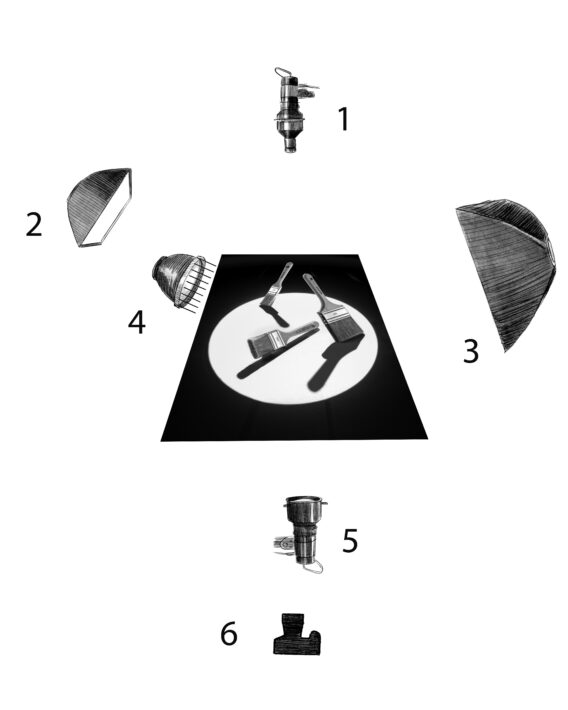
However, the reflective metal parts of all three brushes still appeared completely black. Two additional softboxes had to be placed according to the law of reflection so that the metal surfaces shone. For the two front brushes, this was done by a large 120x180 cm softbox (3). For the small brush at the back, a 35x60 cm softbox (2) was used.
Of course, the soft light from these two softboxes could not be kept away from the white table. An additional shot without these two lights provided the high contrast shadows that were then added in post processing.
The shot was taken with a medium format camera and a focal length of 120mm. ISO 100 was used with aperture 16 and a shutter speed of 1/125s.