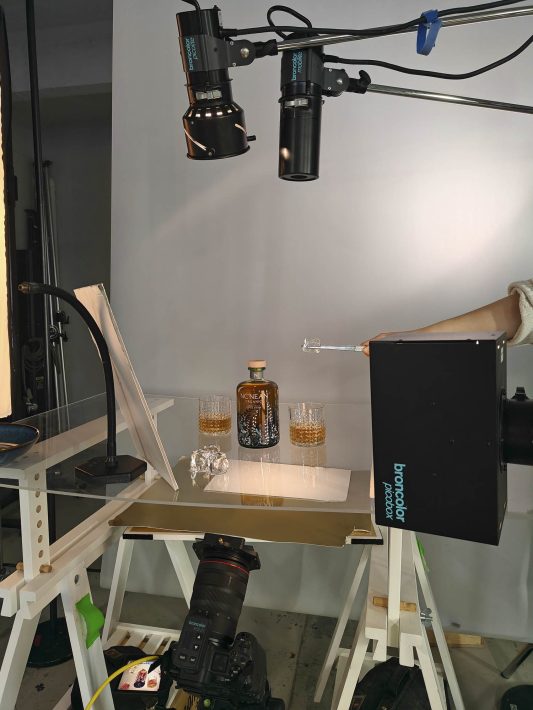
Whisky photography usually leans toward dark, moody libraries and leather chairs. For this project, however, we wanted to break away from tradition and create a high-energy, “exploding” composition. The goal was to capture the Nc’nean bottle – with its unique botanical-etched glass – suspended in mid-air alongside splashing liquids. Achieving this required not only a complex lighting system and an assistant, but also lighting capable of freezing motion with absolute precision while defining the transparency of the liquid without losing the texture of the glass.

The Evolution of the Setup
1. Defining the Background and Transparency
To achieve a vibrant, modern look, we began by placing a clean white diffusion filter behind the scene. A Pulso G with a P65 standard reflector fitted with a blue gel was positioned behind the diffusion. This is crucial for whisky photography, as it allows the liquid to glow from within and showcases the golden hues of the spirit. To enhance the glow further, we placed a white cardboard card behind the whisky bottle and later refined the effect in Photoshop. A small white card was also positioned next to the bottle to gently open up the shadows. On camera left, behind the bottle, we placed a Softbox 30 x 120 with Strip Mask to create crisp edge highlights on both the bottle and the glasses.
2. Highlighting the Texture with Picolites
Nc’nean bottles feature beautiful, intricate illustrations. To make these details “pop,” we used two Picolites – one with a Fresnel attachment and another with a Picobox. Thanks to backward compatibility, we were also able to use a Mobilite light fitted with a Picolite snoot and honeycomb grid, positioned above the glass on camera right. The Fresnel light was placed above the bottle and slightly feathered toward the background. This allowed us to capture a reflection from the white card behind the bottle, helping the bottle’s neck stand out. The Picobox was positioned on camera right and feathered slightly across the bottle to emphasize the textures and illustrations while maintaining smooth color transitions.
3. The Secret to the “Floating” Bottle
We used an acrylic surface that allowed us to shoot underneath the bottle. A polarization filter was placed in front of the lens to eliminate unwanted reflections. Additionally, a sheet of polarizing gel was positioned in front of the Picobox, which helped further reduce reflections from the glass and acrylic surface.
4. Freezing the Moment
When elements are falling through the frame, flash duration becomes critical. To freeze the splashes and suspended elements, we relied on Scoro 3200 S and Scoro 1600 E power packs.
Pro Tip: Eliminating Glare with Double Polarization
With so many angular glass surfaces and splashing liquids, managing specular highlights becomes a significant challenge. While black flags are excellent for cutting light, they cannot eliminate the hazy glare that obscures the rich amber color of the Nc’nean whisky. To solve this, we employed a double-polarization (or cross-polarization) technique. A linear polarizing gel was placed in front of the Picobox, while a polarization filter was mounted on the camera lens. By rotating the lens filter until it was perpendicular to the light’s polarization, we were able to dial out the blinding reflections from both the bottle’s surface and the acrylic. This technique does more than simply remove glare – it also increases color saturation and allows the viewer to see through the glass into the liquid. Thanks to the Scoro packs’ 3200 J and 1600 J power output, we were able to shoot at f/11 and ISO 200 even with a polarization filter that absorbs approximately two stops of light.

Achieving Edge-to-Edge Sharpness: The Power of Focus Stacking
When photographing a complex, three-dimensional “explosion” of elements – from the textured Nc’nean whisky bottle in the center to the splashing liquid around it – depth of field becomes a physical limitation. Even at f/11 or f/16, it is impossible to keep every floating element perfectly sharp. To overcome this, we used focus stacking. This technique involves capturing a series of images while incrementally shifting the focus point from the closest element to the furthest, keeping the camera and lighting completely static. After capturing multiple stackable frames, we photographed the splashes separately, taking advantage of the fast recycling time of the Scoro packs. These frames were then blended together in Photoshop to create a single, ultra-sharp composite image.